Change the WebLogic Administrator Account to a Different User Account (Windows Authentication)
Perform this procedure to change the Weblogic Admin Account user name.
Before you begin
Back up the Files Needed to Restore the Existing Account or Password
Procedure
-
Do one of the following:
-
Prepare a new account in the domain, according to requirements specified in the Technologies, Security and Network Integration Deployment Reference Guide.
-
Identify an existing account in the domain that meets the DRG requirements.
-
-
Verify the new account created or identified in the previous step is working correctly. To do this, open the ldp.exe tool, connect to the domain controller, and do a simple bind using the account, as described below.
-
From the command prompt, start the ldp.exe tool.
-
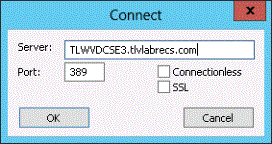
Select Connections > Connect, complete these fields, and click OK:
-
Server: Enter the server name (FQDN) of the domain controller.
-
Port: Enter the port (default 389) to connect to the domain controller.
-
-
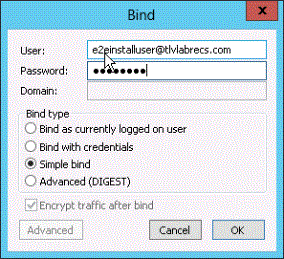
Select Connection > Bind, complete these fields, and click OK:
-
User: Enter the user name of the new account in the User Principal Name (UPN) format.
-
Password: Enter the password for the new account.
-
Bind Type: Select the Simple bind option.
-
-
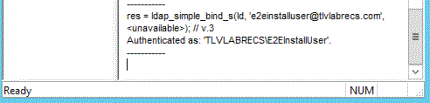
Verify the bind was successful.
A successful bind shows a result such as:
res=ldap_simple_bind_s(id, 'e2einstalluser@tlvabrecs.com',
<unavailable>); // v.3
Authenticated as 'TLVLABRECS\E2EInstallUser'.
-
Use the ldp.exe tool to search for any application user in the Active Directory One of the main user authentication methods supported in the system, allowing customers to leverage Windows Authentication as the authentication mechanism in the system..
-
-
On the Application Server, access the WebLogic administration console using the following URL:
http://localhost:7001/console
-
Sign in to the console using the existing WebLogic Admin Account credentials.
-
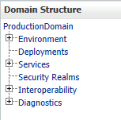
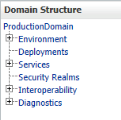
Under Domain Structure (left pane), select Security Realms.
-
In the Realms table, click on BPDBRealm.
-
Click the Roles and Policies tab.
-
In the Roles table, expand Global Roles, then expand Roles.
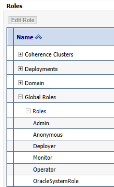
-
For the Admin role, under the Role Policy column, select View Role Conditions.

-
In the Role Conditions: section, click the Add Conditions.

-
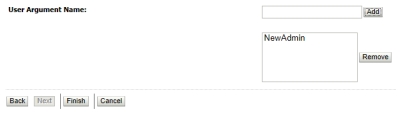
In the Predicate List dropdown, select User.

-
Beneath Predicate List, click Next.
-
In the User Argument Name text box, type the case-sensitive user name associated with the domain account you created or identified in step 1. Then click Add.
-
Click Finish.
-
In the Edit Global Rule screen, confirm the User: field specifies the new username and that the Or operator is selected beneath the new user name. Then click Save.
-
Under Domain Structure (left pane), select Security Realms.
-
In the Realms table, click on BPDBRealm.
-
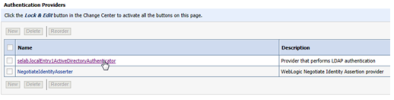
Click the Providers tab.

-
In the Authentication Providers table, click the name of the Active Directory provider. (The Description column for this provider states Provider that performs LDAP authentication.)
-
Click the Provider Specific tab.

-
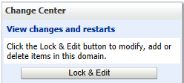
Under Change Center (left pane), click Lock & Edit.
-
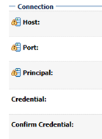
In the Connection section, complete these fields:
-
Principal text box - Type the new user account in the UPN format (for example user@domain.com).
-
Credential text box - Type the password for the account.
-
Confirm Credential text box - Re-type the password for the account.
-
-
Click Save.
-
Under Change Center (left pane), click Activate Changes.
When the changes are activated, the following message displays in the right pane: All changes have been activated. However 1 items must be restarted for the changes to take effect.
-
Use a text editor to update the boot.properties file on the application server.
-
Use Notepad or a similar text editor to open the boot.properties file on the application server at the location below:
%VERINT_WEBLOGIC_DOMAIN_HOME%servers\ProductionServer\security\boot.properties
-
For the username= parameter, type the new username (to replace the existing username value).
-
For the password= parameter, type the new password (to replace the existing password value).
-
Save the boot.properties file and close the text editor.
-
Restart the WFO_ProductionDomain_ProductionServer Windows service from the Services window on the server on which you have edited the boot.properties file.
-
If the WFO_ProductionDomain_ProductionServer service fails to start, or stops unexpectedly, verify the username and password are both entered correctily in the boot.properties file and restart the service again.
-
If the service still fails to start, check for errors in the ProductionServer.log at this location:
-
-
-
Open a web browser and browse directly to the application server on which you have made all of the previous changes.
At the log in prompt, type the username and password of an active user to verify that you can successfully log in using LDAP.
-
From the enterprise portal Home page or main UI access point for all WFO applications., select System Management Module that allows performing suite-wide system management activities from a single, Web-based application, the Enterprise Manager. > Enterprise > Settings.
-
Under Installations (left pane), open the Framework Applications server role.
-
In the Framework Applications server role settngs, update these two fields:
-
Administrator Account Name - Enter the username for the new WebLogic Admin Account here.
-
Administrator Account Password - Enter the password for the new WebLogic Admin Account here. (Click the icon to the right of the text box to set and confirm the password.)
-
-
Wait for the Pending Messages icon to disappear from the top of the screen before continuing to the next step.
-
Verify that the CMA distribution has completed successfully for the application servers.
-
Open the Enterprise Manager Agent Web application installed on every system server that communicates with the Enterprise Manager regarding any configuration changes or alarm messages for the relevant server. (EMA) application on the application server. To access the EMA, enter this URL in the web browser: http://hostname/EMA, where hostname is the host name of the application server.
-
Select Status > System Monitor.
-
In the Status Messages section, look for a message stating: CMA Distribution: complete successfully on date_and_time

-
-
Check the Alarm Dashboard for an alarm indicating that it is necessary to restart the WFO service.
-
From the enterprise portal, select System Monitoring > System Monitor > Alarm Dashboard.
-
In the Alarm Dashboard, look for an alarm named Service restart required that is active on an application server for which you have changed the WebLogic Admin Account.
If you have multiple application servers, you should see one alarm for each application server.
The alarm indicates that it is necessary to restart the WFO_ProductionDomain_ProductionServer service. (The alarm Details pane for an alarm indicates the specific service that must be restarted.)
-
When you see this alarm for an application sever, restart the WFO_ProductionDomain_ProductionServer service on that application server and then acknowledge the alarm.
If the Framework Applications plugin fails, check the pluginerror.log file. This log file is located at <install_directory>\Software\UCMServices\Plugins\Databases\FrameworkApplications.
You must correct this error to complete the account change process
-
Workflow: Change the WebLogic Administrator Account (Windows Authentication)
Change the WebLogic Admin Account Password (Windows Authentication)
Restore the Existing WebLogic Admin Account User Name or Password
Troubleshoot SSO (Authentication Configuration Guide)
Technologies, Security and Network Integration Deployment Reference Guide