Activate the products
After installation, activate each licensed product.
Procedure
-
In a browser window, enter the URL of the system.
-
For a system with database authorization, use the following URL format:
http://<server name>/wfo
-
For a system with Security Assertion Markup Language (SAML), use the following URL format:
http://<server name>/wfo/control/adminsignin
-
-
From the sign-in page, enter the administrator user name and password. (On a new system, the installation process defined the default administrator credentials.)
-
Select Sign in.
-
Go to System Management Module that allows performing suite-wide system management activities from a single, Web-based application, the Enterprise Manager.. Under Licensing Management, select System Licensing.
The License Data page shows the Registration Key, License Registration Number (LRN), Customer Name, and Customer ID.
-
For an existing installation that requires an updated license:
-
Verify the number of maximum units for each licensed product.
-
Review the customer information.
-
-
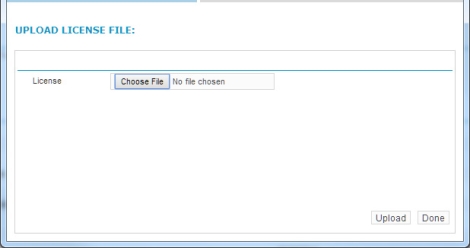
From the Upload License File page, select Choose File.
-
Select the XML activated license file that you saved to your hard drive during the license activation process.
-
Select Upload.
After the upload completes, a message displays on the Upload License File page instructing you to restart all application servers.
-
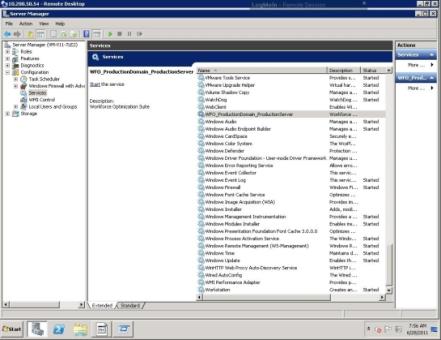
Restart the WebLogic service on the primary application server. Wait for it to be accessible from a browser running locally. The URL to access is http://localhost/wfo/ui/signout. This process takes approximately 15 minutes. After accessibility is confirmed, start all the remaining application servers:
-
Go to Start > Run and, in the Run page, type services.msc.
-
In the Windows Services window, restart the WebLogic service. The service name is WFO_ProductionDomain_ProductionServer.
After restarting the WebLogic service, the License Data page displays the list of all the product features associated with the customer license. To expand product features, select the arrow next to a feature name.
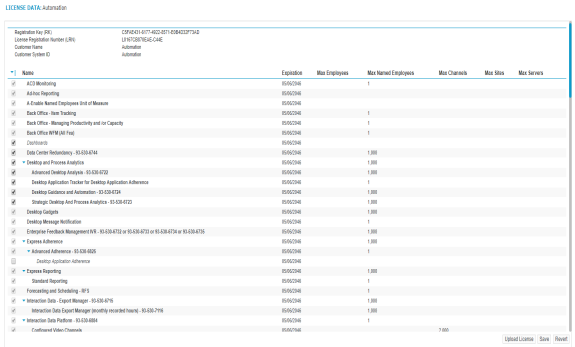
On the page, you see the following types of features displayed:
-
Product features displayed in bold font and checked by default.
Bold features are licensed. If you do not have a license for a product feature, it does not appear on this page.
-
More features displayed in italic font.
Features displayed in an italic font do not require a license; some are checked by default and some are not. These additional features are only visible if you have a license for the parent feature.
Product features can be arranged in a hierarchical order as follows:
-
If a feature at a lower level in the hierarchy is enabled, then all the ones above it are enabled as well.
-
If a feature at a higher level in the hierarchy is unavailable, then the features below it are unavailable as well.
-
-
-
To expand the product feature list for more items, click the arrows beside feature names.
-
To customize the product list and activate more features available to you, select the check box beside each available item.
-
For Identity Authentication and Fraud Detection (IAFD) customers, ensure that you have the appropriate licensing for the Voice Biometrics Library that you intend to use.
-
IAFD customers not using the Fusion Passive Biometrics Library: No additional product activation for the Voice Biometrics Library is required.
-
IAFD customers using the Fusion Passive Biometrics Library: Under IAFD, verify that the check box for Fusion Passive Biometrics Library is selected.
-
-
To remove or revoke certain license items, click inside the check box next to the item you want to remove to clear the check box. After the application server is restarted, these items are no longer available for use in the system.
-
After you complete product activation, use Enterprise Manager to build the hierarchy required for the customer organization. You also need to configure the server roles for activated products.
Uploading licenses for an application server cluster
When uploading licenses for a hierarchy setup that includes application server clusters, you must do the following:
-
Sign in to one of the application servers.
-
Upload the license.
-
On all of the application servers in the cluster, do the following (the first time the license is uploaded, only one application server exists in the cluster).
-
Stop the Watchdog service and the WFO_ProductionDomain_ProductionServer service on each server in the cluster one by one. These services must be stopped on all application servers before proceeding to step b.
-
Start the Watchdog service and the WFO_ProductionDomain_ProductionServer service on primary server only. Wait for it to be accessible from a browser running locally. The URL to access is http://localhost/wfo/ui/signout. This process takes approximately 15 minutes. After accessibility is confirmed, start all the remaining ones in the cluster.
-
If any application servers need to be added to the cluster, add those application servers as described in the Enterprise Manager Configuration and Administration Guide.
Site organization, server setup, and server role Entity that contains a logical, predefined set of components (system software or certified third-party software) deployed in the Data Center and Site Zones that provide specific functionality for the system. configuration (Enterprise Manager Configuration and Administration Guide)
Verify licenses (Identity Authentication and Fraud Detection Setup Guide)